Showing posts with label quilling. Show all posts

Friday, December 1, 2023

Wedding keepsake


A wedding keepsake , which is my favourite projects to work on. It turned out more bigger than I had anticipated.  I cannot believe also that this is my first post for this year. 

 Thank you so much for stopping by. Have a creative day.


Thursday, May 20, 2021

Quilled keepsake


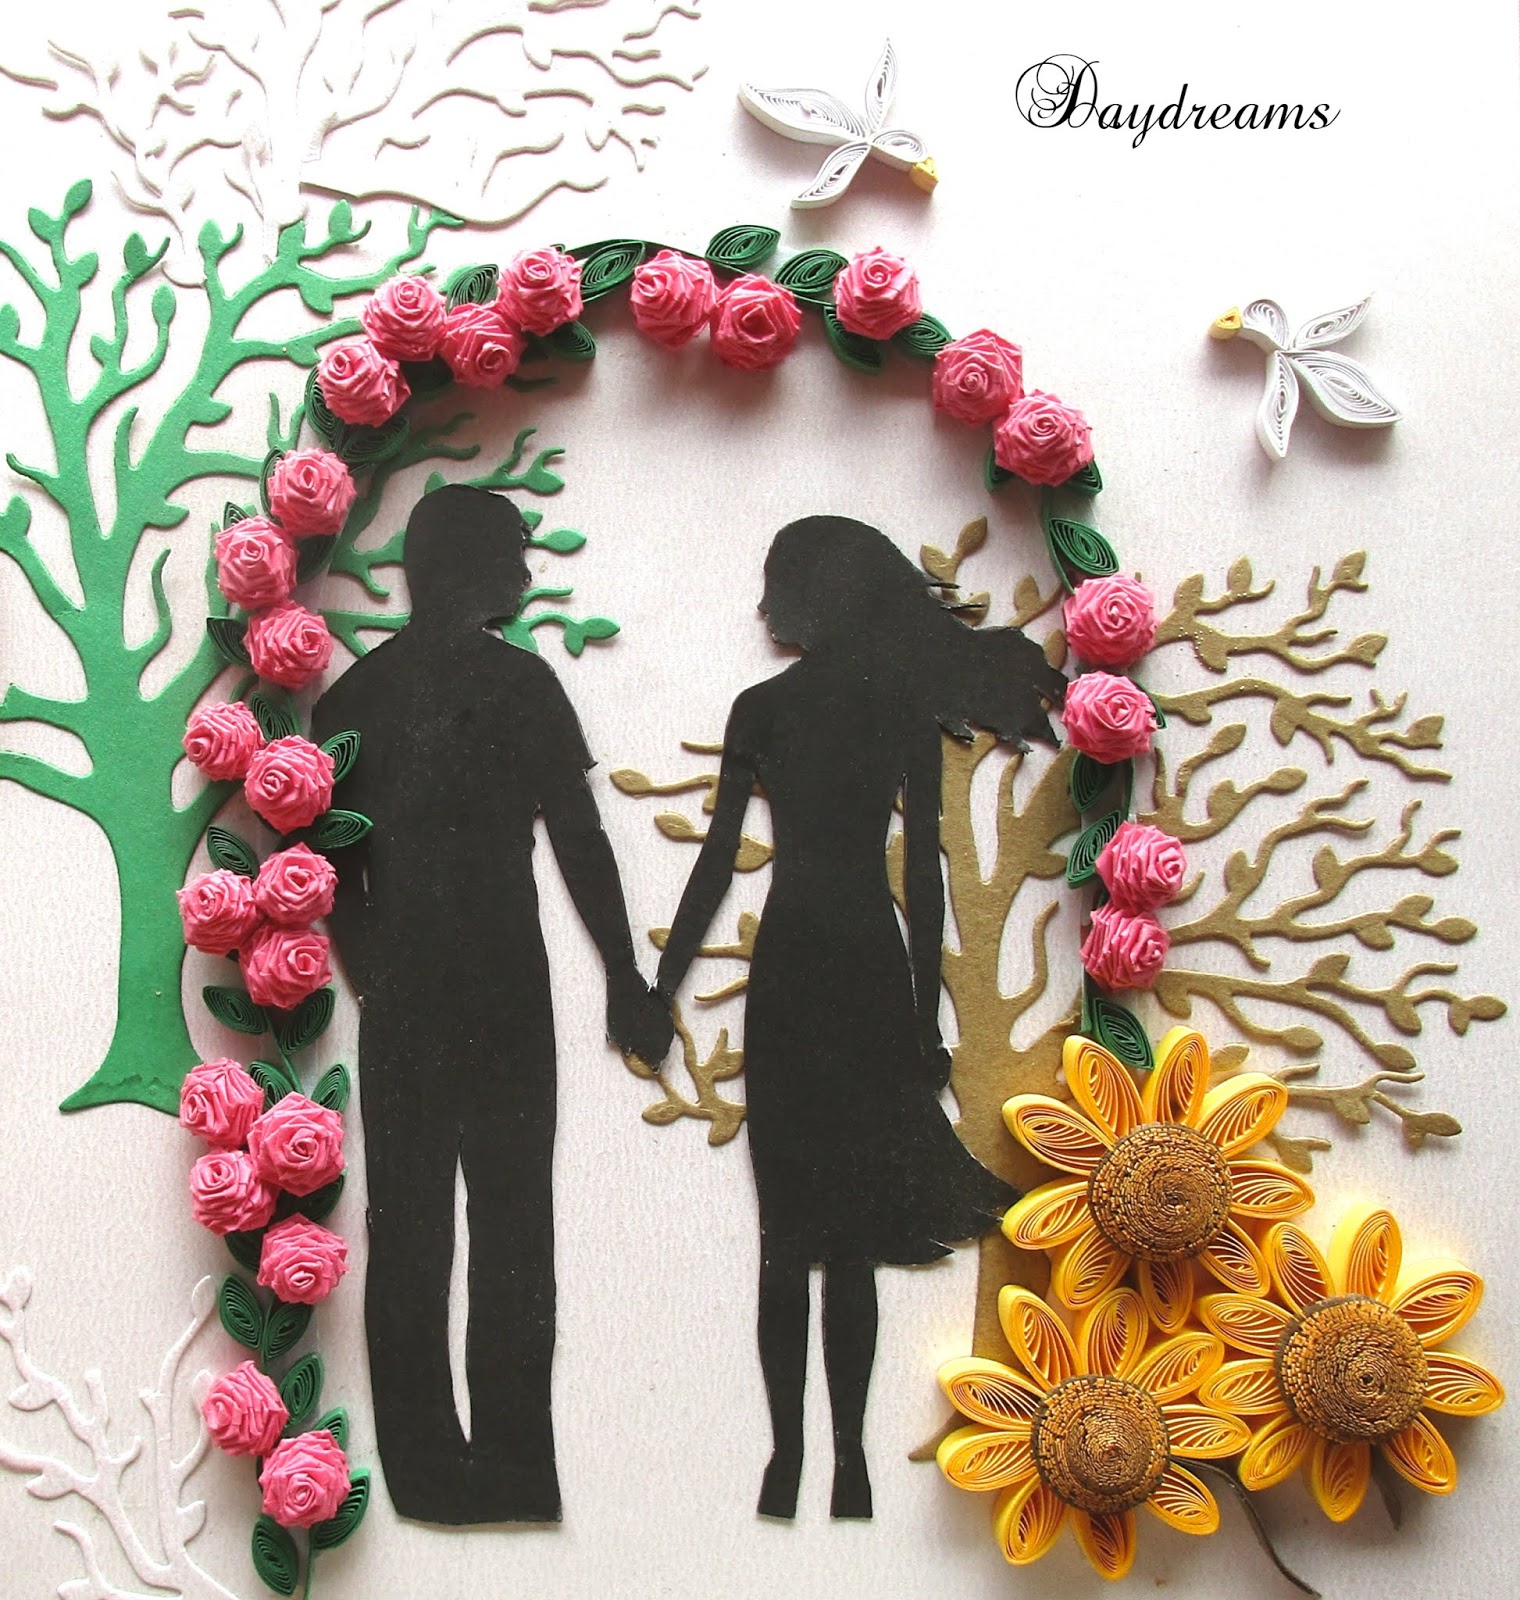
  A simple flower arrangement around a printed picture, I wanted the picture to look like a painting , my son helped me with that . I printed out the picture and then cut it out. I stuck some quilled elements from 1cm strips underneath the picture to give it some depth. Later quilled flowers around it . I was particularly asked to make these pink flowers from my earlier work somewhat like cherry blossoms. Used white cardstock strips to make the leaf like designs.

                    Thanks for stopping by , have a great day.


Saturday, October 24, 2020

Folded roses - Thank you card


  A quick card for a regular customer Chitra. . I love folding roses . This is the Tutorial I follow.


Thanks for stopping by.

Friday, July 31, 2020

Quilled Girl card


A quilled girl card. Rebel I think is a nick name for the little one. Daphne asked me to add the litte crown on top .  I made the dress using 5mm strips that I crimped first.

Thanks for stopping by, Have a great day.

Monday, July 20, 2020

Quilled Banyan tree


    Always enjoyed Quilling these trees. This is for a special request from Daphne. The names of the families are to be added to the hanging roots.  These are the two pictures the completed tree and the one after I added the small details of life under the tree and sheltered by the tree. I have made several Banyan trees and most of them are requested by customers who want to gift there mentors. 

   The pictures are taken at different times and I like both . The technique used for the leaves  here is called beehive quilling . 

   Thank you so much for dropping by.
  

Monday, May 25, 2020

25th anniversary card


    Yet another Quilled frame work. A 25th anniversary keepsake.  I am quilling after a long time and searching for the supplies for the most difficult part.  The flower petals are made using 2 mm paper strips. the blue buds are made using 3mm  strips ,  Rest of the Quilling done with 5mm paper.

Thanks for stopping by.

Friday, May 10, 2019

Quilled peacock


I used an embroidery pattern for this peacock.   I struggled a lot with the colours and the technique at first once I was done I was amazed at the three dimensional effect of the peacock design. The green layered wing is an after thought. This is a request from one of my favourite customers . She suggested the peacock idea along with the name . .The flowers were made mostly to fill the space in between the name and the peacock. I used 5mm for the peacock and 3mm for the flowers.


Tuesday, April 23, 2019

Quilled Monogram S


      I present here another Quilled S. I planned a S with flowers and leaves but somehow ended up making something completely different.
      Nothing much to say about this one. I have used both 3mm and 5mm quilling strips.  Most of the elements are tight coil . The wings are made using tear drops and the long feathers are made using a quilling comb.

Thanks for stopping by , have a great day.

Sunday, April 7, 2019

Quilled Portrait -Andrin


I finally moved out of my comfort zone and took up this challenging project . My first quilled Portrait of a little boy Andrin. I have received several request to quill portraits before but did not know how to go about it so never accepted them.
 I couldn't refuse this one although I did give up after staring at the picture for three weeks I was really scared of putting so much time and energy into a project that might not turn out well. But I was encouraged and assured that it was really okay if it is not perfect. Then again the Quiller in me wanted to try this. My son scanned the picture and reduced the colours and helped me get started. Hunting for the right colours was the next tough job.
I took extra effort to do the eyes as they are the centre of attraction. as the face started to form I started looking forward to working on it. It was a lot of work a lot of rolling for the first time my hand actually ached with all the rolling. But so happy to  have done something that I once thought impossible.
I used 5 mm quilling paper for the baby and 3mm for the background.

Wednesday, February 27, 2019

Quilled wedding keepsake


I finished this quilled floral wedding keepsake after five days of non stop Quilling. The flowers are made using different width strips from 2mm to 5mm. . The little circles are made using crimped lavender colour strips.
  Thanks for stopping by .

Thursday, January 17, 2019

Quilled garden scene


      I made this garden scene for Daphne who wanted a silhouette of a couple in a garden . I found a free image on the internet of this couple printed it out and cut it out . The tree die is a new one which I got from Itsy Bitsy Goa.  The roses are made using 5mm pink strips.

Thanks for stopping by. Have a creative day.

Monday, December 31, 2018

Quilled New year


        A very happy New year to all my readers. Have a fantastic creative 2019.

Tuesday, December 18, 2018

Quilled logo


  This is a logo of a Silk saree company.  I was asked to Quill the logo to be framed and gifted. 
I used a maroon colour slightly thick strips for the outline and a dark red colour to fill the inside. Although I used the same red colour through out the use of different technique has resulted in different texture. 

Sunday, December 2, 2018

Quilled wedding keepsake


I would like to share another wedding keepsake with you all. The pink flowers are made using beehive technique using two tone quilling paper. I took impression of the numbers from a printed paper and quilled over it. 

Friday, October 26, 2018

Quilled daddy card


        This is my most recent work , The word Daddy in paper quilling. It took me way more time than I had planned for the project. The filling in the word was the most time consuming . I had to cut little pieces of white paper strips and stuck them horizontally. The entire card is made using 220 gsm card stock hand cut paper strips. I painted a metallic bronze colour to the black strips and the centres of the flowers.
         Altogether I liked how the card turned out.

         Thanks for stopping by , Have a great day


Friday, September 28, 2018

Quilled bride


I love how this dress turned out . I took a free image on the internet for reference , decided to make a complete white gown for the bride . Wish I could have used a background which would make the dress pop out , but this is a small part of a big work and all the elements is mounted on the same background paper. I don't seem to have as much time as I used to so progress is very slow. I have to thank dear Daphne for being so patient.

Thanks for stopping by. Have a great day.

Friday, September 21, 2018

Banyan tree quilled


This is a smaller version of my banyan tree. The leaves are made using 5 mm green strips in three shades. The stem is made using four shades of brown hand cup from card stock.


Thursday, August 2, 2018

Quilled G clef


     This is a small part of a huge framework for someone who is a great music lover.
I experimented a lot with this piece , Initially planned to quill only the space around the note then I  feared the note might not pop out the way I wanted it to so filled it with beehives . I had to roll almost two packs of white to complete the circle almost wished I had rather used beehives for the circle too. Now I am glad I used the tight coils it gives a nice mosaic finish to this piece.

Friday, July 27, 2018

Quilled reunion logo


I had the opportunity to quill the reunion logo for Stanley medical college 82 batch reunion. 

Wednesday, July 18, 2018

Love Quilled


          This is inspired from Sabeena Karnik's work , I took a font I loved and added swirls around it . It was not easy and it does look busy in some places I have learnt that I have to plan more well in ahead of putting the strips on paper .

       Thanks for stopping by have a lovely day.